Friday, March 28, 2008

Lesson 8 - Lifting Out Waves

Paintings can be worked up in watercolor by lifting out paint as well as by applying paint directly. This can create some wonderful water effects. In this demonstration I covered the paper with yellow, green and blue paint. While the paint was still wet I pressed in a crumbled paper towel to create the central white blob. I dragged a clean, damp brush to lift out the lower curvy lines and I splashed in drops of water in the upper right.


Next I added some rocks and refined it a bit with glazes to create a crashing wave scene.


Here are some other artists' paintings from the workshop.

Carol got a great feeling of movement depicting a side view of a wave cresting.

By keeping the left edge of the rock light, Jean created a feeling of spray obscuring the rock.

Jessalyn got some wonderful splatters and drips to create a rich foam texture.

Joan was able to lift out some very realistic foreground foam areas.

Wednesday, March 19, 2008

Bolinas and Point Reyes

My husband and I took a couple of days to explore Marin County and do some casual birding. As usual I came back with ideas for a month's worth of paintings. Here are a few photos.


The egrets and herons are just beginning to come in to nest at the Audubon Ranch in Bolinas.

One of the esteros and Drake's Bay in Point Reyes.

Saturday, March 15, 2008

Lesson 7 - Masking Tape

Masking tape works well as a resist. It's super easy to apply and makes great straight edges. In this exercise we laid down strips of tape and worked on an abstracted still life.

In this example I painted a slightly different view in each section and let the white lines created by the tape unite the piece.

Adelheid used the tape to add a second, subtle dimension to her design.

Kazuyo created a complex still life with forms traveling over and under the taped grid.

Susan let the tape lines combine with the white flowers to create new interesting shapes.


Teresa created different width tape resist lines by cutting and combining tape pieces.

Carol was working on absorbent paper. The paint ran under the tape and created a loose feeling of leaves.

Tuesday, March 11, 2008

Lesson 6 - Designing with Shapes - Children

A common exercise in life drawing classes is to quickly paint in a model as a silhouette shape as he/she holds a series of one minute poses. It's possible to set up a similar exercise with photographs. In this case we collected photos of children playing and did a series of 10, one minute studies.


The next problem is to envision the figure in the rectangle format of a painting. Should the figure be cropped in close? Can you divide the background into interesting shapes? Is the background darker or lighter than the figure shapes?
Give yourself four minutes to draw and block in a roughly 3" x 5" sketch.


In the workshop we did four of these four minute sketches and chose one to develop into a larger 1 1/2 hour study. Many found that having to work fast forced them to simplify and concentrate on a strong design rather than getting hung up on details.


Marsha's figure repeats interesting angles and the green background brings attention to the head.


Jim used horizontal shapes in the background to unite the vertical figures.


Pat created strong skin tones on the face to unite the dark hair and shirt.


Alice ended up with a long vertical format. She created an interesting division of space behind the figure.

Anna's Hummingbird


It's spring. We've had weeks of sun and I've been inspired to tackle a hummingbird painting. This is the male and I've begun a companion piece of the female and young.

Monday, March 3, 2008

Lesson 5 - Texture

It's useful, and a lot of fun, to experiment with ways of making marks on paper without using a brush. Textures can be stamped on with sponges, crumpled paper or plastic, velcro, bubble wrap, cotton balls, leaves, cardboard edges and so on.
Lines can be drawn with twigs, toothpicks, yarn, credit cards and anything else handy.
Paint can be sprayed with a toothbrush, dribbled on or blown through a screen.
The challenge in this exercise is to create a 'texture sheet' using as many different ways of applying paint as possible. The idea is to put texture on top of texture and to have every few inches of surface different.


Here is one example of a 'Texture Sheet'. And below are several examples of ways to put this to use.

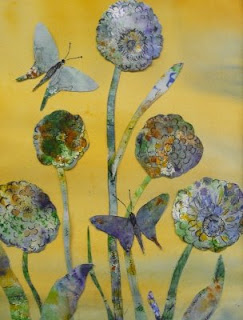
Georgina cut out shapes from her texture sheet and glued them onto paper coated with a yellow wash.

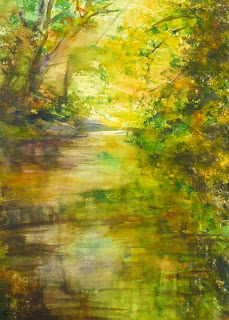
Jean glazed over the lower portion of her texture sheet and refined the texture on top until she had a luminous landscape and water reflections.

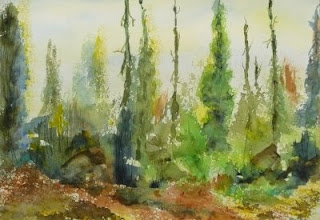
Lois created a landscape as she was putting together her texture sheet. Trees were created by tilting the paper and letting the paint drips run.


Pat used the textures she discovered in the texture exercise to quickly paint a small landscape. After putting wet washes on the top and bottom sections she ran a band of textures across the middle.